M. CONTE(*), A. MANUELLO(**), L.MAZZA(*), C.VISCONTE(*)
(*)Politecnico di Torino, Dipartimento di Meccanica
Corso Duca degli Abruzzi, 24 – 10129 Torino, Italy
(**)Università degli studi di Cagliari, Dipartimento di Ingegneria Meccanica
Piazza d’Armi, Cagliari, Italy
[email protected], [email protected], [email protected], [email protected]
Abstract
This paper presents an experimental procedure for measuring contact pressure between a pneumatic actuators lip seal and its counterpart. Measurements were performed in static conditions, by means of an experimental test rig.
The test rig, properly designed in order to reproduce real operating conditions, allowed measurements on a lip seal rectilinear specimen. The seal sample was faced to a plate, representing the cylinder rod surface, made of the same material and having the same roughness of the cylinder rod. Contact pressure was evaluated by means of a film sensor interposed between the seal and the faced surface. Tests were carried out under different load conditions. A suitable procedure was developed for the used film sensor calibration.
Results, gathered using the herein described experimental procedure, were compared with numerical results, obtained by simulations performed using a FEM commercial code. A good agreement was found out between the differently gathered data.
Keywords pneumatics, seals, elastomers, contact pressure, film sensors.
1 Introduction
High speed and reliability, low friction and long life-time are characteristics more and more often required in pneumatics. With specific reference to pneumatic linear actuators, these performances are highly affected by the guiding systems, viz. piston guide ring and rod guide bushing, and by the sealing systems behavior.
As can be found in literature, many studies were carried out with the aim of evaluating friction forces, sealing effectiveness and durability of entire pneumatic components or of their single parts (guiding systems and seals). These characteristics were evaluated with different geometries and materials, with various mounting conditions and tolerances and, finally, with various working conditions (applied loads, air pressure, greasing and lubrication, velocity) [1-7]. Referring to reciprocating seals, as many kind of materials, geometries and dimensions can be used and as there is a wide variability of working conditions, the analysis is particularly complex and time consuming. Low friction, optimum sealing capability and long life-time must be guaranteed in any of these conditions. Studying these characteristics requires a deep knowhow of phenomena occurring in the contact zone between the seal and its counterpart, and the analysis of contact pressure distribution is also needed. In literature research works performed both numerically, by using FEM simulations, and experimentally, by using suitably designed test rigs, can be found [8-12]. Some of these research works [9, 11, 12] allowed to define new low friction elastomeric seals geometries, both for oleo-hydraulics and pneumatics. In [13] a methodology for analysing contact conditions in a multi-lip reciprocating seal was developed. In particular, contact pressure was measured by means of a special radial force meter, suitably designed; the test rig was proposed as a tool for quality control in seal production. Another approach for measuring interface contact pressure consists in employing pressure sensitive films. Various examples can be found in literature about the use of these sensors in the biomechanical field, e.g for articular joints and prosthesis [14-16]. In [17] Fuji pressure sensitive films were used for contact area and contact pressure evaluation on a hydraulic lip seal for rotating shafts, under different interference fits.
An experimental procedure for contact pressure measuring between a pneumatic actuators lip seal and the rod counter surface is herein presented. Measurements on a rectilinear piece of a lip seal, cut from a high diameter ring, were performed in static conditions, by means of an experimental test rig. The seal sample was faced to a plate representing the cylinder rod surface. The test bench allows reproducing the real lip seal operating conditions. Contact pressure was evaluated by means of a film sensor interposed between the seal and the faced surface. A suitable calibration procedure was developed for the used film sensor. Experimental results are compared with numerical ones, obtained by simulations performed using a FEM commercial code. A good agreement was found out between the differently gathered data.
2 Contact Pressure Experimental Measurement
The contacting surface between the lip seal and the rod was investigated by means of a specific experimental procedure employing pressure sensitive film. Measurements have been performed on a rectilinear seal; to this aim, a segment was cut from an high diameter ring (500 mm diameter) for testing it as a straight specimen.
The lip seal under test is a commercial lip seal designed for sealing in pneumatic cylinder rods; it is normally used in lubricate-for-life cylinders. The seal cross section and main dimensions are shown in Figure 1; dimensions were measured by means of an optic profile projector [3, 10]. The seal consists of a NBR 75 nitrile butadiene elastomer with hardness of about 75 IRHD. The elastomer mechanical properties were identified in [10] by means of a uniaxial tensile compression test.
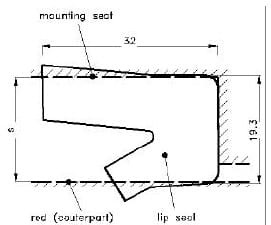
Figure 1: Seal cross-section and main dimensions
The rig scheme for the contact pressure measurement is represented in Figure 2. It is made of a base (1) on which the test chamber (2) is fixed; the seal segment (3) is mounted in the test chamber faced to a plate surface (4), which behaves as the rod of a pneumatic cylinder. Plate material (chromium plate stainless steel) and roughness (~0.4 mm Ra) are the same as in a real cylinder rod. The chamber is supplied by compressed air so to provide a pressure load on the seal specimen as in real working conditions. The test chamber is provided with a window (5) made of a transparent resistant glass; the window allows the seal cross-section to be visuali
zed during the tests.
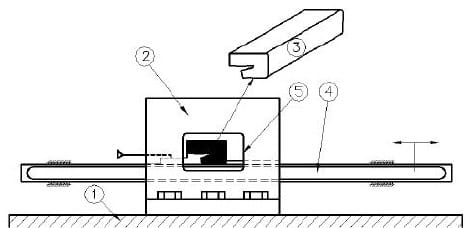
Figure 2: Scheme of the test rig for contact pressure measurements
The seal mounting has been performed according to nominal dimensions (see Figure 1: s =19 mm) whereas air pressure load of 0.2, 0.4, 0.6 MPa has been chosen.
Tests have been performed by a Fuji Prescale pressure sensitive film placed between the lip surface and the faced plate. The film is made up of two matched paper-like layers: a first film is coated with a micro encapsulated colour forming material; a second film is coated with a colour developing material. Applying a load on the film, microcapsules are broken so that a distribution of magenta colour, with a certain density, is obtained, depending by true pressure distribution and magnitude. An example of colour distribution is shown in Figure 3.
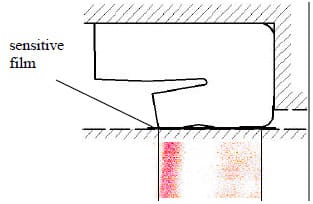
Figure 3: Example of colour distribution along the contact surface
As there is a pressure below which no capsule will be broken, this sensor has a minimum threshold below which stress values cannot be registered. Also, there is a pressure which will break all the capsules, corresponding to an upper threshold.
Although a precalibrated densitometer, which converts magenta tones into pressure values, could be supplied by the manufacturer, an own calibration procedure was developed, using a suitable test rig (see Figure 4).
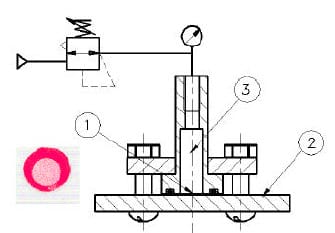
Figure 4: Scheme of the calibration test rig
The sensitive film (1) is placed on a smooth surface (2) and faced to chamber (3), which can be gradually pressurised. Using air pressure rather than calibrated weights allows to avoid edge effects.
Having acquired the print images with a 24 bit scanner, an average value of the colour intensity distribution was picked up into the target area. In this way it was possible to associate a contact pressure value to each magenta tonality. Similar procedures are described in a series of papers [14, 15, 18], which used a grey scale acquisition. In the work herein presented, the RGB colour component percentages, associated to the magenta hues, are analysed.
The calibration curve, needed to evaluate prints from the experimental tests on real parts, was so obtained.
It has to be noted that complex temperature-humidity charts, needed for proper calibrationcurve selection for densitometer use, are not required since both calibration tests and final measurements on the lip seal are obtained under identical environmental conditions.
3 Finite-Element Analysis
A finite element analysis was performed in order to evaluate seals behaviour under different operative conditions. To this aim the FEA software Ansys 10.0 was employed in the simulations.
A plane model of the seal was developed by means of eight nodes plane elements and surface-to-surface contact elements; the rod surface and the seat were considered as rigid elements. Boundary conditions take into account friction at the seal contact surfaces using the Coulomb friction model. The friction coefficient values are: f=0.1 between the seal and the rod surface (grease lubricated contact), f=0.4 on the seal-seat contact (dry contact).
Seal material was modelled considering an incompressible, isotropic, hyper elastic material; the second order Mooney-Rivlin formulation with five constants was employed. These constants were computed by the numerical code fitting experimental data [10]; Poisson’s ratio n was assumed to be equal to 0.49.
Load was applied step by step, reproducing real operative conditions; in particular, at first, mounting is simulated, according to nominal dimensions (see Figure 1, with s=19 mm); then air pressure is applied on the seal left side. Air pressure was set to 0.2,0.4,0.6 MPa.
4 Results Comparison and Discussion
Graph in Figure 5 shows contact pressure experimental distribution along contact surface, in various load conditions. It has to be pointed out that, even if the used pressure sensitive film has a reliable measuring range from 0.2 MPa to 0.6 MPa, during calibration procedure it seemed to be sensitive and consistent to the calibration curve also applying lower pressures. For this reason, drawing all gathered data was considered reasonable.
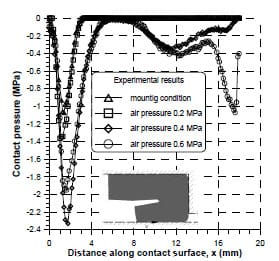
Figure 5: Experimental pressure distribution along the contact surface
As can be seen, the normal force acting against the counterpart, represented by the graph area, tends to increase while moving from a simple mounting condition to the applying of an higher and higher air pressure. On the other hand, when air pressure becomes high enough, there is a contact area increment and contact pressure distribution exhibit other local maximum also on the seal right side.
Figure 6 shows the lip seal Von Mises stress field on the deformed shapes, obtained under different load conditions. In particular, simulations refer to mounting condition (see Figure 6a) and to mounting condition plus a pressure load of 0.6 MPa (see Figure 6b). It can be noted that moving from the first to the second condition, contact area involves the entire lip surface.
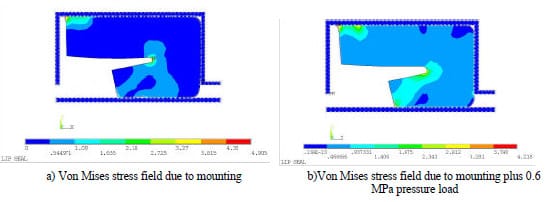
Figure 6
Finally, the graph in Figure 7 compares experimental and numerical results, when 0.6 MPa is used as load condition. It can be seen that there is a good agreement in terms of pressure peaks, general trend and normal force.
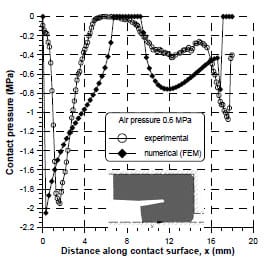
Figure 7: Comparison between experimental and numerical contact pressure distribution
5 Conclusions
The good agreement found out between the herein presented numerical and experimental procedures highlights that both these methods could be a viable tool in design evaluation of lip seal. Furthermore, sensitive sensor film reliability was confirmed, even if a very careful calibration procedure is needed, so it would be used for future contact pressure evaluation in real ring-shaped lip seals.
References
- G. Belforte, N. D’Alfio, T. Raparelli, Experimental Analysis of Friction Forces in Pneumatic Cylinders, Journal of Fluid Control 1, 42-60, (1989).
- L. E. Schroeder, R. Singh, Experimental study of friction in a pneumatic actuator at constant velocity, Journal of Dynamic Systems, Measurement and Control, Transactions of the ASME 115, n. 3, 575-577, (1993).
- T. Raparelli, A. Manuello Bertetto, L. Mazza, Experimental and Numerical Study of Friction in an Elastomeric Seal for Pneumatic Cylinders, Tribology International 30, n. 7, 547–552, (1997).
- T. Kazama, M. Fujiwara, Experiment on Frictional Characteristics of Pneumatic Cylinders, Proceedings of the 4th Int. Symp. On Fluid Power, S. Yokota (eds.), JHPS (publ.), Tokyo, Japan, 453–458, (1999).
- T. Fujita, L.R. Tokashiki, T. Kagawa, Stick-slip Motion in Pneumatic Cylinders Driven by Meter-out Circuit, Proceedings of the 4th Int. Symp. On Fluid Power, S. Yokota (eds.), JHPS (publ.), Tokyo, Japan, 131–136, (1999).
- G. Belforte, T. Raparelli, L. Mazza, Analysis of Typical Component Failure Situations for Pneumatic Cylinder under Load, Lubrication Engineering 48, 11, 840-845, (1992).
- G. Belforte, T. Raparelli, L. Mazza, Life Tests on Elastomeric Lip Seals for Pneumatic Cylinders, Tribotest Journal, 3, 3, 251-266, (1997).
- A.Gabelli, F. Ponson, G. Poll, Computation and Measurement of the Sealing Contact Stress and its Role in Rotary Lip Seal Design, Proc. of 13th International Conference on Fluid Sealing, BHR Group Publ., Bedford, UK, 21–39, (1992).
- P. Botto, E. Dragoni, A. Strozzi, Finite Element Redesign of a Reciprocating PTFE Rod Seal, Proc. of 13th International Conference on Fluid Sealing, BHR Group Publ., Bedford, UK, 671–683, (1992).
- C. Bignardi, A. Manuello, L. Mazza, Photoelastic Measurements and Computation of the Stress Field and Contact Pressure in a Pneumatic Lip Seal, Tribology International, 32, n. 1, 1–13, (1999).
- C. Calvert, M. Tirovic, T. Stolarski, Design and Development of an Elastomer-Based Pneumatic Seal Using Finite Element Analysis, Journal of Engineering Tribology, 216, n. J3, 127–138, (2002).
- G. Belforte, A. Manuello, L. Mazza, Optimization of the Cross Section of an Elastomeric Seal for Pneumatic Cylinders, Journal of Tribology, 128, 406-413, (2006).
- C. Debler, M. Gronitzki, G. Poll, Investigation into the sealing contacts of reciprocating elastomeric sealscorrelation of calculations with measurements and optical observations, 17th International Conference on Fluid Sealing, York, U.K.,169-186, (2003).
- R.J. Singerman, D.R. Pedersen, T.D. Brown, Quantitation of pressure-sensitive film using digital image scanning, Experimental Mechanics, 27, 99-105, March, (1987).
- A.B. Liggins, W.R. Hardie, J.B. Finlay, The spatial and pressure resolution of Fuji pressure-sensitive film, Experimental Mechanics , 35, 166-173, (1995).
- J. Z. Wu, W. Herzog, M. Epstein, Effects of inserting a pressensor film into articular joints on the actual contact mechanics, Journal of Biomechanical Engineering, 120, 655-659, (1998).
- Chun-Ying Lee,Chao-Sung Lin, Rui-Quan Jian, Chih-Yung Wen, Simulation and experimentation of the contact width and pressure distribution of lip seals, Tribology International (Article in press).
- F.Aymerich, M.Pau, Assessment of nominal contact area parameters by means of ultrasonic waves, Journal of Tribology 126, 639-645,(2004).


