Flatness can be defined as a condition of having a smooth, even, and level surface without a slope, tilt, or curvature. Since flatness is an important mechanical characteristic, there are many methods for flatness measurement. The simplest technique for how to measure flatness involves using a flatness checking instrument like a depth gage connected to a dial indicator. More elaborate optical devices (profilometers) have been developed for non-contact flatness measurement. However, innovative techniques are needed to measure base flatness between two contacting surfaces.
One such technique was used by Pavan P. Jorwekar, Yogesh V. Birari, and Mayur M. Nadgouda of the Product Engineering Department, Kirloskar Copeland Limited, Karad, Maharashtra, India. This group was developing new design schemes for compressors using non-CFC refrigerants as mandated by the Montreal Protocol. A published report of this work is titled, “Cylinder Head Gasket Contact Pressure Simulation for a Hermetic Compressor”.
Gasket joints are essential components in hermetic compressors. When clamped between two stationary compressor members, the gasket fills any gaps and prevents leakage. During assembly, however, the compressor flanges can distort or warp. The objective of this work was to study the distribution of cylinder head bolt tension on the gasket surface to determine the affects of the distortion on gasket pressure.
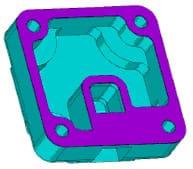
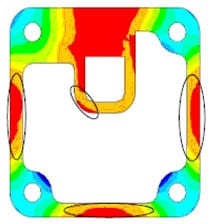
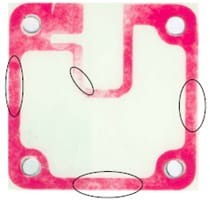
Jorwekar et al used the Finite Element Analysis (FEA) tool, ANSYS, to analyze the cylinder head and gasket distortion. Figure 1 illustrates the FEA model. The analysis (Figure 2) helped in finding the contact pressures across the gasket resulting from pre-torques applied through the bolts. Actual Flatness Measurements were obtained using Fujifilm Prescale® Pressure Indicating Film (Figure 3) available from Sensor Products Inc. to validate the ANSYS analysis.
In Figures 2 and 3, any lack of flatness is manifest in low pressure areas, which are “circled” by ellipses. Design modifications were eventually performed to remove the low pressure areas on the gasket.
 Fig 1: FEA Model of Cylinder Head and Gasket |  Fig 2: Gasket Pressure Pattern Obtained from ANSYS |  Fig 3: Gasket Contact Pressure Obtained from Fujifilm Prescale® Film Test |


