J.C.E. Stranart, A.B. Liggins, J.B. Finlay and C.H. Rorabeck
Orthopaedic Research Laboratory, University of Western Ontario, University Hospital, 339 Windermere Road, London, Ontario, Canada, N6A 5A5
Introduction
An important aspect in the design of components for joint prostheses is the magnitude and distribution of interface pressures which will occur between adjacent components in service. A low degree of congruency will produce high pressure areas which may lead to mechanical breakdown, particularty of the polyethylene components.
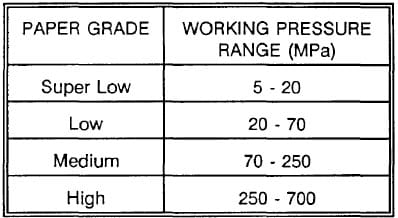
One method of assessing the magnitude and distribution of interface pressures between two surfaces is to insert Fuji Pressure Sensitive Film (PSF) between them. This consists of an A-film coated with microencapsulated dye and a C-film coated with colour developing material. A section of each is placed together such that their coated surfaces contact, the overall thickness being 200μ. Pressure across the interface breaks dye capsules on the A-film, more being broken with greater pressure. The dye released develops a pink stain on the C-film, the density at any point being dependent on the pressure at that point. Four grades of film are available, covering four pressure ranges (Table I). The density/pressure relationships for each of these is dependent on environmental factors, particularly temperature and humidity and it is therefore necessary to calibrate the film before taking recordings.
A system was required which would allow for calibration of the four grades of PSF and then use this data to produce both grey scale and false colour prints of experimental stain recordings.

Table I. Manufacturers quoted working ranges for Fuji PSF.

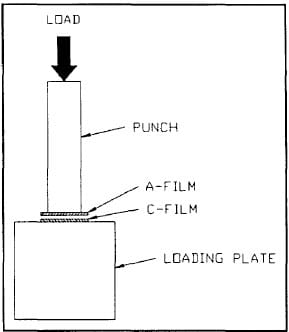
Fig I. Calibration loading of Fuji PSF
Materials and Method
For each grade of paper, standard calibration stains were obtained for up to ten different applied pressures over its working range, using a flat surfaced punch and loading plate assembly mounted on a MTS universal testing machine (Fig I). A grey scale image of each stain was captured using a system consisting of a copy-stand mounted CCD video camera and a PC equipped with a data imaging board and Image Pro II software. Each image was filtered using a blurring technique so that an average pixel value, relating to pressure, was obtained.
Complimentary software was written In C for Image Pro II, which first applied curve fitting techniques to the calibration data in order to obtain an expression relating pixel value to pressure for each grade of paper at the time of calibration. Subsequent experimental stain recordings were then manipulated in the following manner. The value of each pixel on the digitized image was used to determine the pressure at that point and the pixel assigned a new value according to a standard pressure/ pixel value chart for that paper grade and redisplayed. This converted the original image to one utilizing a grey scale of known pixel value/ pressure characteristics, allowing for direct comparison between recordings taken under various calibration conditions. This image could then be printed out for publication use, or converted to a false colour image, using a standard pressure/ colour palette for that paper grade. Images from the same interface area using the four grades of paper could also be combined using a global colour palette, giving a more complete view of the pressure magnitudes and distribution over the area of interest, but with a requisite loss in pressure resolution.
Discussion
Due to the number of calibration stains required to produce sufficient data points, calibrating each paper grade can be a lengthy process, but the resulting process is more flexible than the previous method of using look-up tables for temperature and humidity effects and assuming linearity for certain portions of the calibration curves.
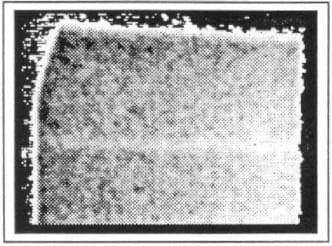
The system has been used in the calibration and analysis of in-vitro PSF recordings of the interface pressure distribution and magnitudes between components in a total knee replacement. Fig II shows an example grey scale print from between the femoral and tibial components.

Fig II. Typical PSF printout


