Moch. Agus Choiron¹, Yoshihiro Kurata², Shigeyuki Haruyama³ and Ken Kaminishi&sup4;
Moch. Agus Choiron is doctoral student at Department of Mechanical Engineering, Yamaguchi University, Japan and lecturer at Department of Mechanical Engineering, Brawijaya University, Indonesia. Email : [email protected] or [email protected]
Yoshihiro Kurata is master student at Department of Mechanical Engineering, Yamaguchi University, Japan.
Shigeyuki Haruyama is Ass. Professor at Graduate School of Innovation and Technology Management, Yamaguchi University, Japan
Ken Kaminishi is Professor and Dean at Graduate School of Innovation and Technology Management, Yamaguchi University, Japan
Abstract
The contact width is important design parameter for optimizing the design of new metal gasket for asbestos substitution gasket. The contact width is found have relationship with the helium leak quantity. In the increasing of axial load value, the helium leak quantity is decreasing and the contact width is increasing. This study provides validity method using simulation analysis and the result is compared to experimental using pressure sensitive paper. The results denote similar trend data between simulation and experimental result. Final evaluation is determined by helium leak quantity to check leakage performance of gasket design. Considering the phenomena of position change on the convex contact, it can be developed the optimization of gasket design by increasing contact width.
Keywords— contact width, simulation, pressure sensitive paper.
I. INTRODUCTION
ASBESTOS gaskets is a good gasket to prevent leakage and used for plumbing in many industries. However, it is extremely chemical substance dangerous, causing serious illnesses. In Japan, the production of asbestos and its usage have been decided to be banned since 2008. The development of alternative gasket material has been begun in Japan more than 20 years ago, but it has not given any satisfactory result. In general, alternative gasket materials are less elastic than asbestos and they need much adjustment on pipe joints to prevent leaks. The costs of alternative gasket material at time are too expensive. But perceptions are gradually changing as the reason for the delay of the material alternative development, and there was no alternative material could replace asbestos gasket after it is being banned on the production and usage. As it is extremely urgent to solve the situation above immediately, the development of alternative gasket materials to replaced asbestos gasket is an important social issue.
Saeed H.A et al. [1] proposes super seal gasket, a new metal gasket that incorporates strategically placed circumferential annular lips. These lips, owing to the spring effect of the metal, form seal line with flanges. The result justify the selection of contact area as a reasonable evaluation creation as design parameter to optimize 25A metal gasket for leakage performance. From this study, 25A gasket shape is optimized, but limits size of contact area as design parameter is not defined yet.
Haruyama S. et al. [2] investigated the limits size of contact width as gasket design parameter. In this study, the gasket leakage is identified using leak quantity from helium test with justification from the presence of leak by water test. The criterion for gasket with no leakage is the gasket with helium leak quantity less than 1.0×10⁻⁶ Pa.m3/s with contact width limits is 0.8 mm for upper or lower convex contact. This value, furthermore, is used as decision criteria for the evaluation of the performance of the gasket design for 25A metal gasket.
C.Y. Lee et al. [3] used pressure sensitive paper to measure the contact width and the pressure profile of the lip seal due to its accuracy, speed, and economic cost. In this study, using similar method, contact width on metal gasket using the elastic effect for asbestos alternative gasket derived from FEM analysis will be validated by the one derived from pressure sensitive paper. Similar trend data is expected from the validation process. The results will be used in the development of the performance of the gasket design using contact width as a main parameter for gasket design.
II. METHODOLOGY
The gasket used in this research is circumference beads gasket as illustrated in figure 1. The shape of the gasket is produced by a mold press. When the gasket is tightened to the flange, each bead of both surfaces of gasket created elastic effect and produced high local contact stresses to prevent leakage. This circumstance made the range of conventional clamping load could be possible to use. The dimension of gaskets used is standard dimension based on JISB2404 [4] with 1.45 mm of gasket thickness. On the other hand, material used is SUS304 due to its effectiveness in high-temperature and high-pressure environment. In order to ensure the properties of the test material, SUS304 is initially examined using tensile test carried out based on JISZ2241 [5]. The results is plotted in the stress-strain diagram as shown in figure 2.The diagram indicates the nominal stress (s) of SUS304 is 398.83 MPa and the modulus of the elasticity is 210 GPa.

Fig. 1. The basic dimensions of the gasket used in this research.
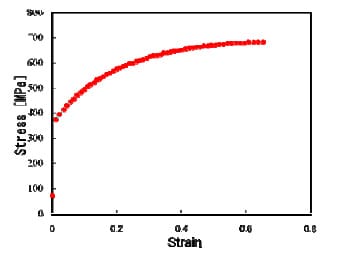
Fig. 2. The SUS304 stress-strain diagram
2.1 Contact width measurement
To validate contact width parameter of the proposed new gasket directly, Fuji pressure sensitive paper was used. Due to the ease of application, validation method using prescale pressure sensitive paper is one of most popular methods used in contact area and pressure in joint measurement for industrial purpose. Prescale pressure sensitive paper is able to produce an accurate and economic permanent high resolution surface topography of contact pressure distribution [6]. The first procedure of validation method is to form the paper into the designed form. The designed form is furthermore placed in between the joining parts of gasket and flange as show in figure 3. The tightening process is carried out based on the clamping load. After the load is applied, red patches will be stamped in th
e paper as an illustration of pressure distribution profile that occurred between the two surfaces. The focus of this research is to observe red patches stamped in the paper and measure contact width of the gasket directly. The points of measurement are located on and under the gasket and measurement are performed at four point of contact width as depicted in figure 4.
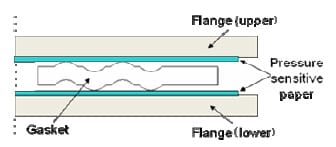
Fig. 3. Measurement procedure using pressure sensitive paper
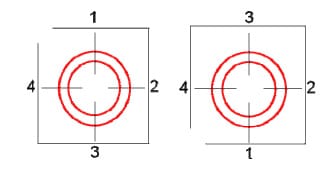
Fig. 4. The contact width measurement on the upper and lower of pressure sensitive paper
Using two dimensional assumptions, elastoplastic model is made to adopt compression displacement in axial direction on gasket in between the upper and the lower of the flange (figure 5). This modeling is undertaken using finite element method analysis software MSC Marc [7]. The flange is assumed as rigid body in both sides. The gasket is in the contact condition to the lower side of the flange, and then the upper side of the flange pressed the gasket in axial direction as shown in figure 6. In axisymmetric analysis used in this research, Mises’s yield condition was applied for plastic yield condition, updated Lagrange method was used for formulation of non-linear deformation behavior, and Newton-Raphson method was utilized for elucidation of nonlinear solution equation.
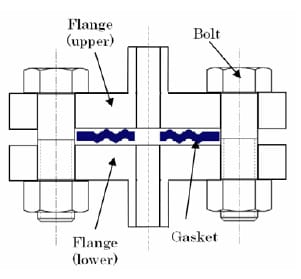
Fig. 5. Schematic section of piping model
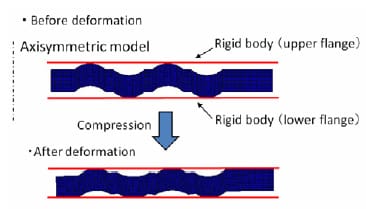
Fig. 6. Axisymmetric gasket model
2.2 Leak quantity measurement
The schematic diagram of the helium leak measurement device, as shown in figure 7, was developed for leak quantity evaluation test of the gasket. In order to evaluate gasket performance, quantitative measurement of leak flow by the helium gas was undertaken. In this research, the vacuum method which has the highest detection ability in the helium leak measurement was selected and utilized based on JIS Z2330 [8] and JIS Z2331 standard [9].
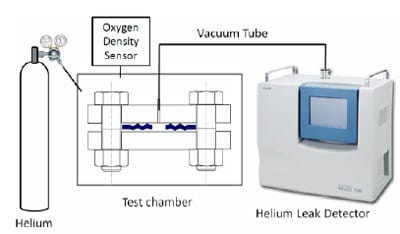
Fig. 7. The schematic diagram of the helium leak measurement device
In the test chamber, the helium gas was injected in the outer part of gasket. The content of residual oxygen in the chamber was measured by the oxygen density sensor. The helium density in the outer part of gasket could be calculated and the measurement is performed when the oxygen density is below 0.2 [%], and helium density above 99 [%] at the atmosphere condition. Using helium leak detector (HELIOT 702D1 ULVAC corporation production), the minimum leak quantity that could be detected by this instrument examination is 1.0E-11 Pa.m3/s, and the maximum one is approximately 1.0E-03 Pa.m3/s. Measurement is taken from 300 to 500 seconds to avoid the influence of leak flow fluctuation at the time of the initial measurement.
The flange used in this test was a general-purposed flange based on JISB2220 [10] with 10 K pressure and 25A diameter as shown in figure 8. The flange and joint was welded carefully to avoid a distortion. To avoid the experiment error due to the leakage from the joint of the flange and pipe, the leak flow quantity of joint part was also calibrated.
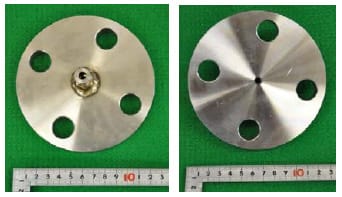
Fig. 8. Appearance of general-purpose 25A flange
Clamping load of the flange is caused by the tightening of flange by bolt. Converting tightening torque of bolt into the axial load is general procedure in clamping load evaluation. However, the accurate axial load prediction could not be reached due to various friction coefficient of each bolt and nut in the clamping. Variation of the clamping load due to clamping order of the bolt also contributed to the inaccurate axial load prediction. On the other hand, one type of experiment is undertaken by adding compression load to flange using universal testing machine in order to cope with these problems. In this research, axial load measurement was held by embedding strain gauge to the bolts, therefore the axial load could be directly measured (figure 9). For the evaluation of the clamping load and the leak quantity, the leak quantity is measured based on the measurement of helium leak flow quantity. The variation of clamping load measured are 10, 15, 20, 25 and 30 kN for each bolt. The axial load of each bolt was monitored in order to adjust the appointed axial load error to below 3%.
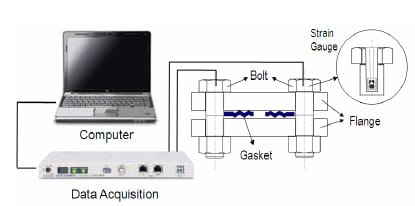
Fig. 9. Measurement of clamping load
III. RESULT AND DISCUSSION
As shown in figure 10, the red patches appear on pressure sensitive paper after load was removed. The patch was zoomed in using CMOS camera. The value of contact width could be seen in figure 11 as a result of measurement using pressure sensitive paper. On the other hand, figure 12 illustrated results produced by MSCmarc simulation.
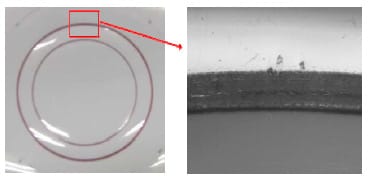
Fig. 10. The red patches appeared on pressure sensitive paper at 120 kN load
As shown in both graphs (figure 11 and 12), the axial load affected the contact width significantly. With the more value of axial load, the more the value of contact width. The increase of contact width effect started at axial load value of 60 kN.
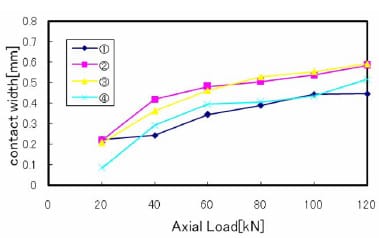
Fig. 11. Contact width measurement result produced by pressure sensitive paper
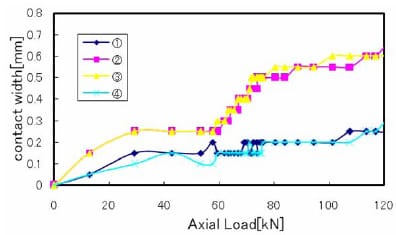
Fig. 12. Contact width measurement result produced by MSCmarc simulation
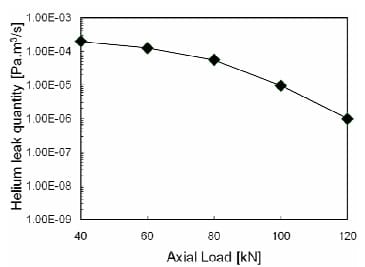
Fig. 13. Leak measurement test result
The leak measurement result of the proposed gasket is shown in figure 13. It is indicated from the figure that the leak quantity decreased with increasing of axial load. In addition, when axial load exceeds 60 kN, the inclination of leak quantity decrement is larger. In this study, the qualitative explanation produced by water pressured test is transformed into quantitative value using helium leak test. Therefore, quantitative decision criterion to prevent the leak is determined under the condition of helium leak quantity below the 9.6×10⁻⁶ Pa.m3/s. It is observed that the leak by water p
ressure test did not occur at 10 MPa condition as shown in table 1. This value is furthermore taken as decision criteria for the evaluation of the performance of the gasket design in this recent research.
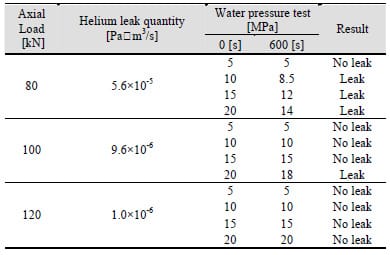
TABLE I COMPARISON OF HELIUM LEAK QUANTITY AND WATER PRESSURE TEST RESULT
(Haruyama S., et.all :2009)
The results denote similar trend data between simulation and experimental result. Disagreement between results produced by both methods occurs due to the phenomena of position change on the convex contact, especially on the outer side of the gasket at each increment load (figure 14). The value of position change as shown in figure 15 denoted that the convex contact 1 and 4 have bigger value of position change than the convex contact 2 and 3. Therefore the value of contact width produced by experimental result tends to be larger than the one produced by simulation. Based on it, the contact width at convex contact 2 and 3 is more considered for analysis than convex contact 1 and 4. In addition, surface roughness of gasket is one important factor to consider in simulation for contact width determination in the next study.
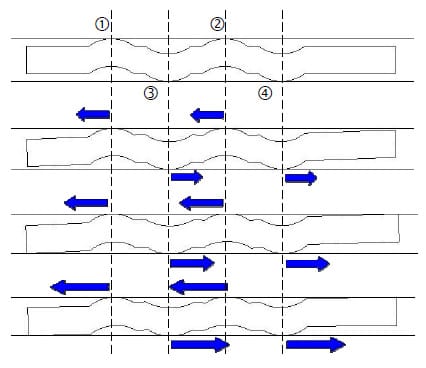
Fig. 14. The phenomena of position change on the convex contact at load of 0, 40, 80 and 120 kN
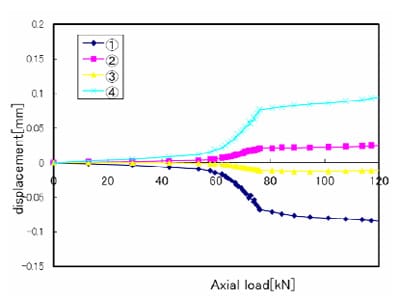
Fig. 15. The value of position change on the convex contact
In the increasing of axial load value, the helium leak quantity is decreasing and the contact width is increasing. Based on this circumstance, it can be concluded that the contact width has relationship with the helium leak quantity. This fact is very useful if used in the evaluation of gasket performance. The result of the present study shows that the contact width can be employed to evaluate the sealing performance. This conclusion has a good agreement with the previous research [1-2]. For further optimization, this method can be developed to increase contact width and obtain low loading on gasket metal. For next research, the contact width size evaluation will be conducted for other size gaskets. Finally, this study suggest the importance of simulation work at pre-design stage to clarify the main parameters of gasket design analysis due to its effective ability to optimize the design before mass production.
IV. CONCLUSION
The comparison between simulation analysis using MSC Marc and contact width measurement result using pressure sensitive paper is analyzed. From the study, it can be concluded that the results denote similar trend data between simulation and experimental result. Disagreement between results produced by both methods occurs due to the phenomena of position change on the convex contact size. Considering the phenomena of position change on the convex contact, it can be developed the optimization of gasket design by increasing contact width.
ACKNOWLEDGEMENTS
Thanks are addressed to the Strength of Material Laboratory Research Group, Yamaguchi University for their help.
REFERENCES
- Saeed, H.A, Izumi S., Sakai S., Haruyama S., Nagawa M., Noda H., “Development of New Metallic Gasket and its Optimum Design for Leakage Performance”, Journal of Solid Mechanics and Material Engineering, Vol. 2, No. 1, pp.105-114, 2008.
- Haruyama S., Choiron M.A, Kaminishi K., “A Study of Design Standard and Performance Evaluation on New Metallic Gasket”, Proceeding the 2nd International Symposium on Digital Manufacturing, Wuhan China, pp. 107-113, 2009.
- C.Y. Lee, C.S. Lin, R.Q. Jian, C.Y. Wen, “Simulation and experimentation on the contact width and pressure distribution of lip seals”, Tribology International Vol. 39, pp. 915–920, 2006.
- JIS B2404, Dimensions of gaskets for use with the pipe flanges, Japanese Standards Association, 2006.
- JIS Z2241, Method of tensile test for metallic materials, Japanese Standards Association, 1998.
- Pressure measuring film-FUJI prescale film instruction manual.
- MSC Marc 2007. User manual.
- JIS Z2330, Standard recommended guide for the selection of helium leak testing, Japanese Standards Association, 1992.
- JIS Z2331, Method of helium leak testing, Japanese Standards Association, 2006.
- JIS B2220, Steel pipe flanges, Japanese Standards Association, 2004.


